Purchased described as "Has a ROM error". Started by creating a JAMMA adapter, and then read the EPROM at 2E, it was not found under Romident, burned and installed a replacement. No change. Removed and read all ROMs in row/column 2, and all but one of them failed to be identified by Romident, burned and installed 5 more replacements, working! Still have to wire up an amplifier to correctly test the sound, but looks good so far.
[07/30/03] I finally found the brain cell that got me to realize that I could use my inductive listener (a telecom tool, often used with a tone tracer) to test the sound. It works!
Solution: Replaced bad ROMs
Sold!
Purchased described as "dead". Started by creating a JAMMA adapter (I hate creating adapters, it is tedious work). Yep, she is dead alright: screen has static garbage and required some tweaking to sync correctly on my test bench monitor. Watchdog is barking, disabling it has no effect on the screen's contents. Board already had some previous work done in it, solder-side contains more than 20 jumps to connect some RAMs back onto the bus(es).
Started by checking the daughterboard, seems OK. Next to remove, socket and replace the 74LS245s on the board because word has it that they tend to be the cause of most problems, the Galaxian Trouble Shooting Logic Board manuals lists similar symptoms connected to those chips, and the Fluke 9010 troubleshooter says that the address lines are tied. Other than that, I cannot come up with a good wait to check them! :)
Gotta wait for some replacement sockets and chips to come in...
[07/30/03] Got 'em
in, working on the board soon...
[Some time later...] Well, so much for THAT idea; board is
still in the same condition, with address line 12 tied low. After taking
another look at the schematics, I am going to try replacing the 74LS367s
at 7-D and 8-D and see what happens. Gotta order those
now...
[07/31/04] Only took a year to get back to this...! :) Well, replacing them did nothing. I did discover one broken trace and jumped around it.
While messing around with the board I noticed that pushing on the CPU effected the the signals on some of the CPU's control, address and data lines. For example, my logic probe would have a stronger flash depending on how I pressed on the CPU. Replaced the socket and the game actually does something long enough to prevent the first watchdog timeout from resetting it.
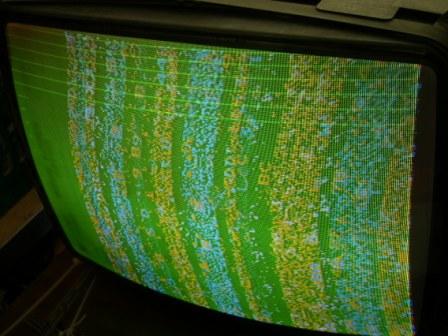
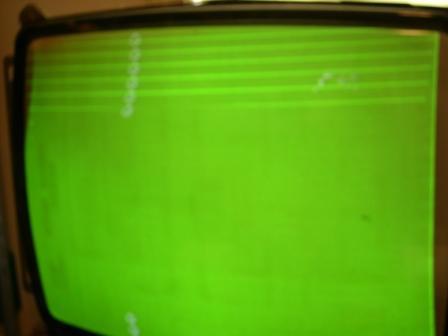
Started taking a closer look look at the board and after staring at it for 45 minutes I noticed a broken connection. Repaired it, and now I have a totally different screen; it went from Figure A, a static garbage display, to Figure B, which is drawing some seemingly random graphics/data near the upper right hand corner with a row of static zeros on the left that go through the bottom to the top of the screen (watchdog is disabled, it does not reset it in this state). Well, at least that is some kind of progress...! Right?
| These images are thumbnails, click on them to increase their size. | |
| Figure A - Before | Figure B - After |
|
|
|
Using the Galaxian Test ROM, the game does not watchdog (uh, I think...), but the Test ROM just seems to quickly fill the screen with what-looks-like-half-circles, briefly clear the screen and then display garbage?
[08/01/04] Used MAME to see what the Test ROM does, realized that I have the wrong graphics EPROMs on the board. Now the Test ROM starts the same as it does on MAME, but then gets futzed up.
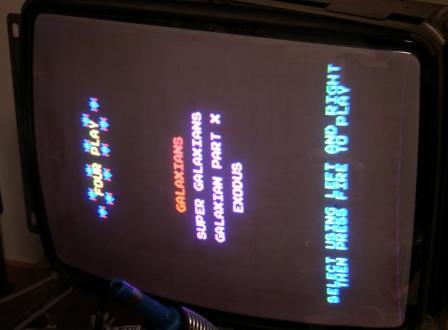
Started examining the underside board again and was about to undo the mods required for the Four Play when I noticed a blob of solder shorting two pins on the back of the board! Removed it, and the board kinda runs the Test ROM, but differently than in MAME. Tried out the Four Play EPROM and it comes up to a menu(!), but gets hung up there or at least, does not respond to controls):
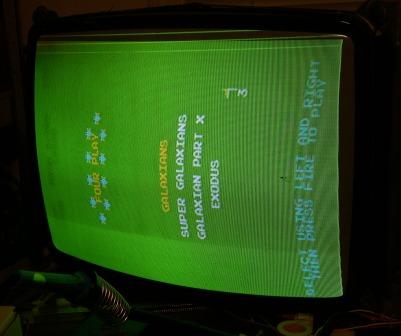
Notice the kinda-flag looking character and the number '3' near the upper right hand corner of the screen, kinda where I had that random garbage earlier. Hmmm... No controls, possible RAM issues... The 138s?
My eyes get drawn back to the bank of 3 138s and I notice that where I had not repaired where I previously had clipped one of their address lines (as part of an earlier troubleshooting effort). Connect 'em back up and...
Nothing! A blank screen! Further playing around with each of the chips leads me to believe that at least one of them is bad; either 8M or 8N. I am going to pull all three and socket & replace them. anyone got some 138s lying around that I can buy?
(Also, I am starting to think that my Fluke Z80-Pod is busted...)
[08/02/04] Well, well, well... Going through my chip inventory, I found a tube of 138s and another tube of sockets to match! When I removed two of the three 138s (8M and 8N), they literally broke into pieces! Clipped and desoldered 'em, cleaned the holes, dropped in the sockets, put in the new 138s and whadda know... Sucker came right up! (Also figured out why the screen was green; here is a tip: try not to switch your Video Green and Video Sync lines!). She works and plays great:
(Actually, there is one small problem, the background sound (the one that speeds up as you destroy enemy ships) starts getting faster right from the start of a game and get real fast real fast; within 30 seconds, it is faster than I have ever heard it go. Since it happens on all of the games, I think it is something on the board. But that is a tale for another time...)
Solution: Replaced 74LS245s, repaired/jumped broken trace, repaired part of previous fix, replaced CPU socket, replaced the three 74LS138Ns, removed an unintentional solder bridge. (It could also use to have all its sockets replaced...)
Galaxian Related Resources: |
|
| PAC-MAN Information (similar hardware) | http://www.csh.rit.edu/~jerry/arcade/pacman/ |
| Arcade Game Over | http://www.arcadegameover.com/board_repair.html |
| Coin Operated Video Game Conversions | http://www.marvin3m.com/video/ |
Flashing "1" in corner of screen. Took a look at the Pac-Man troubleshoot by picture guide (available at http://www.arcadegameover.com/board_repair.html) and that pointed me to "4R video RAM bad". Swapped it, no good!
Tried swapping other RAMs, no change either. Started pulling all socketed chips and found a bent pin on the ROM at 6-E! straightened it, and reinserted, Pac lives once more.
That will teach me to try the simple checks/fixes before the more complex ones...
Solution: Fixed bent pin on a ROM chip.
-----------Board 2-----------
Game would boot normally, but would then start getting random lines/glitches through the screen after running for a couple of minutes; they did not otherwise effect gameplay. Immediately suspect video RAMs, start hitting 'em with the freeze spray and sure enough, got a bad one. Replaced it, and all is well!
Solution: Replaced bad RAM chip.
PAC-MAN Related Resources: |
|
| PAC-MAN Information | http://www.csh.rit.edu/~jerry/arcade/pacman/ |
| Arcade Game Over | http://www.arcadegameover.com/board_repair.html |
| Coin Operated Video Game Conversions | http://www.marvin3m.com/video/ |
| Pac Man Info (very detailed and very technical) |
http://users.erols.com/mowerman/pacfile.htm |
| Pac-Man Hacks | http://www.purecope.com/pacman/index.htm |
Some sprites are missing, but still in the game. For example, when you throw the Pepper, it is not drawn on the screen, but it still stuns the bad guys. One or two of the bad guys are also invisible, so Peter Pepper can effectively get killed by nothing!
Game does not draw garbage where these graphics/sprites should be, they are just never drawn at all, so I do not think that it is a ROM or RAM problem. Not knowing too much about this, my first guess is that the specific sprite(s) are not getting their data placed in the appropriate spot when it comes time to draw the required sprites. So into the schematics I go... (Will start on this soon...)
Solution: None yet.
Update: David Widel said on his web page (www.widel.com) that he was looking for a Cook Race board. I contacted him about it and he said that he would be interested in it so I gave it to him. Better to further the arcade/multigame cause than to have it sitting on my shelf collecting dust!
Boots and passes self-test, but immediately coins itself up and starts playing(!) itself. Looks like some of the inputs are firing rapidly and randomly. Grounding one of the enable pins on one of the 74LS253's seems to make it settle down for a few seconds, so I will try playing with it. (Will start on this soon...)
[07/30/03] OK, it looks like one of the outputs (za) is always low, regardless of the inputs. Will try swapping it out.
Solution: None yet.
Random garbage (no sprites) and occasional random sounds, reboots randomly. Clock looks good, address and data lines have what appears to be otherwise normal activity. Pulled EPROMs and Romidented them; Romident does not identify all but 2 of them, and the two that are identified are not identified as Kicker ROMs! (I am gonna have to contact Toby B. about that...)
OK, so I pull the EPROM archive for Kicker, and match them up that way. Three of them match up, four do not. Hmmm... One of the EPROMs does not erase(!). Going digging for a replacement...
Solution: None yet.
Bought this Pod in "tested good" (yeah, right!) condition from a surplus company. Pod passes its self test without any problems, so I naturally trusted the results and thought that the Pod was working correctly. Turns out that the pod was not working correctly, but I did not figure this out until tearing apart a Galaxian board based on what the Pod was telling me (see above).
The Pod would always report that the Address lines were tied together, and stuck low. Would fail the Bus Test immediately when placed into a UUT. Once I realized that the Pod was not working correctly, I tried replacing all socketed components in the Pod (CPU, EPROM, 6532A, 74LS00, etc.) before I tried swapping the UUT cable (the one that connects to the CPU socket on a UUT) and then everything worked great!
During my troubleshooting efforts, Art Mallet, AKA Artfromny, provided invaluable assistance and was even nice enough to send me a working Z80 Pod, and parts from a physically damaged one, to help me troubleshoot and repair my broken Pod! I cannot say enough good things about 'em. But I can say this: thank you very much, Art; you are definitely one of the best out there!
Solution: Replace UUT cable.